Set up Custom Domain
With EZsite Pro and Premium plans, you can connect your own domains or set up custom .easysite.host domains for your projects. Follow these steps to add and manage your custom domain:
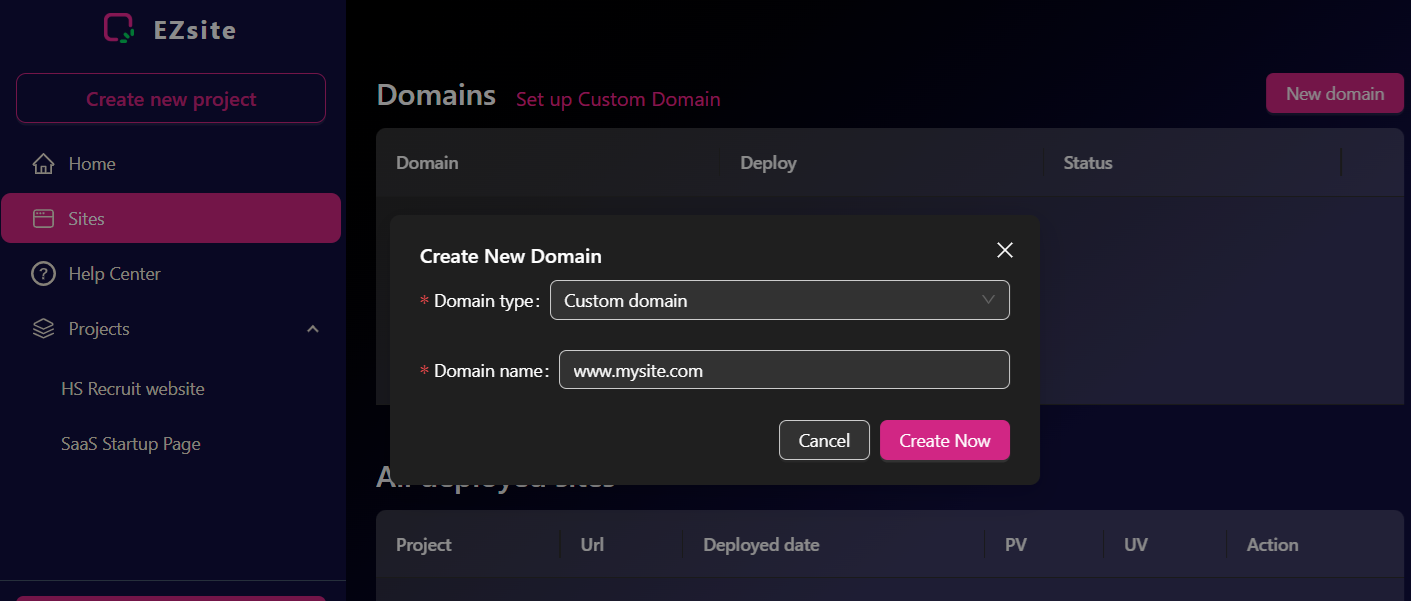
1. Navigate to the sidebar and click the Sites button.
2. Click New Domain and choose Custom Domain from Domain type dropdown box, then click Create Now.
3. Setting Up Root Domain Custom Domain In Your Domain Registrar
-
Setting Up Root Domain Custom Domain Using CNAME Record
Here are the steps to configure a CNAME (Canonical Name) record:
Access your domain name service provider: Log in to your account and locate the domain name you want to configure for DNS resolution.
Note: When setting up your CNAME record, please use client.ezsite.ai as the CNAME value. For the Host Name, you can choose any name you prefer, such as "Site".
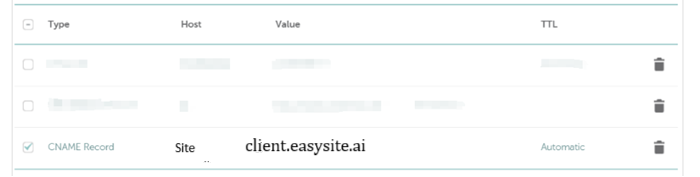
For yourdomain.com (Non WWW), You need to set your host value on CName to @, and point to client.ezsite.ai. For www.yourdomain.com, your host value is www, point to client.ezsite.ai. And on EZsite, you need to use two custom domain: www.yourdomain.com and yourdomain.com to point to the same project.
Update DNS records: Find the DNS (Domain Name System) settings or DNS management options. Add or modify the DNS records to configure your custom domain. Use CNAME record.
Point the domain to your website or service: In the DNS settings, specify the destination URL (ezsite.ai)
Save your changes: After entering the necessary information, click the "Save" or "Apply" button to confirm your new DNS configuration.
-
Setting Up Root Domain Custom Domain Using A Record
DNS Configuration Instructions
To connect your root domain (e.g., mydomain.com) to your EZsite account, follow these steps:
1. Access Your DNS Provider
- Log into your domain registrar or DNS hosting provider (GoDaddy, Namecheap, Cloudflare, etc.)
- Navigate to the DNS management section
2. Create A Record
- Type: A Record
- Name/Host:
@(represents your root domain) - Value/Points to:
40.112.140.56 - TTL: 300 seconds (or leave as default)
3. Save Changes
- Save the DNS record
- Changes may take 24-48 hours to propagate globally
4. Verify Setup
- Wait for DNS propagation
- Visit your domain to confirm it redirects to your EZsite
Note: Remove any existing A records pointing to other IP addresses for your root domain to avoid conflicts.
Need help? Contact your DNS provider's support if you're unsure how to access DNS settings.